DMC staff helped to record and edit Fondren Fellows Showcase on April 6, 2017. Below is a summery of recording set up and editing techniques:
Recording:
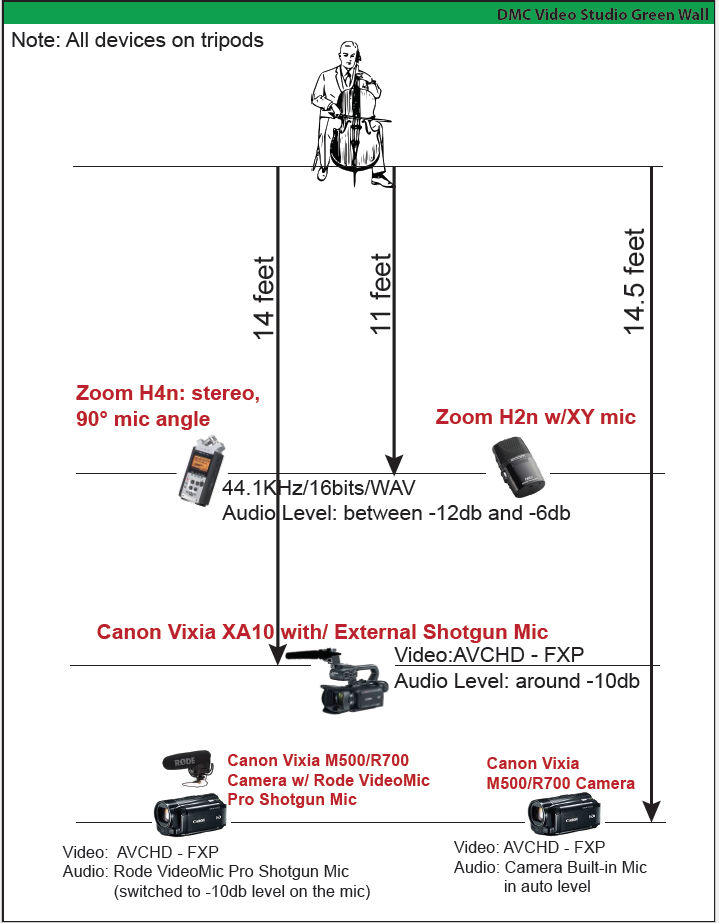
Equipment:
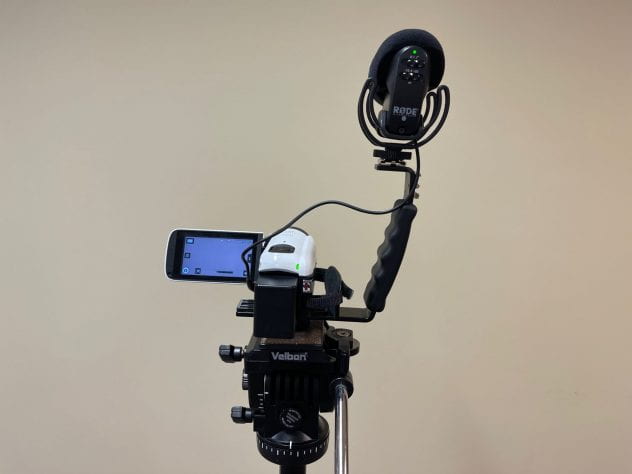
- Canon Vixia HF M500/R500/R700 HD – SD Memory Card
- Rode VideoMic Pro Compact Shotgun Microphone
- Velbon Videomate 607 Aluminum Tripod
The camera was mounted on the tripod, the rode shotgun mic was mounted on the camera using the mounting bracket that comes with the mic set.
The camera:
- Recording mode – Auto
- Video
- video format – AVCHD (i.e. H.264)
- video quality – FXP (i.e. Resolution – 1920×1080, Bit Rate – 17Mbps, Frame Rate – 60i). For a 32GB memory card, the recording time is 4 hours.
- Audio
- when an external mic is connected to the camera’s Mic port, the audio input level indicator will be displayed on the LCD screen automatically, even in auto mode.
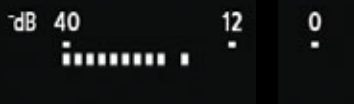
- A good audio input level should fall between -12db and 0db.
- when an external mic is connected to the camera’s Mic port, the audio input level indicator will be displayed on the LCD screen automatically, even in auto mode.
The mic:
- The high-pass filter was selected
 and the audio level switch was set to 0dB since the audio meter on the camera LCD monitor showed the level was good and fell between -12dB and 0dB.
 - If the speaker’s voice is low and the audio meter drops below -12dB when you are monitoring the audio level, you may consider to switch to +20dB to boost recording level.
- For more information about the Rode Shotgun microphone, please refer to the following note: “Easily accessible on the rear face of the microphone are the power, the level controls and a selectable high-pass filter at 80 Hz. The filter will prevent low-end noise such as air conditioners and traffic from being recorded. Furthermore, the -10 dB (or pad) is suitable when recording loud sound sources such as live music, motorsports, or interviews, where the subject is very close to the camera. There is a +20 dB level boost designed for use with DSLR cameras, so the user can reduce the camera’s preamp level, effectively reducing the amount of noise generated by the camera’s audio circuitry.”

Note: If you are familiar with camera settings, you may also choose P mode on the camera so that you have more controls such as adjusting audio input level manually.
Editing:
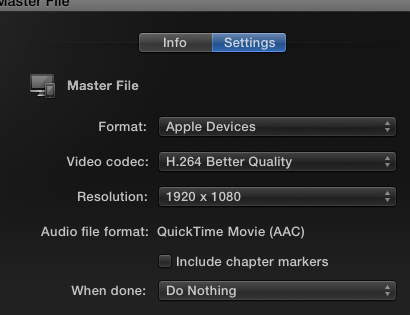
The recording was imported into Final Cut Pro X and split into three segments. Trim tool was used to remove unwanted clips. Title, transition, and lower third were added to each segment. Each final video was exported as Master File for Apple Devices with the highest resolution (1920×1080) as .m4v format. Apple Devices format is suitable for web upload or longer videos as it reduces the file size while maintain decent audio video quality.
See the videos at https://www.youtube.com/playlist?list=PLJ6BYcLAShRqqQl-P8mj2YiENCUVBkpri
Things can be improved:
The video quality can be improved by setting up two cameras with one focusing on the slides and the other focusing on the presenter. However, muti-cam editing will be involved in the post production phase thus more time is required for editing. It depends on user’s recording need, if a simple recording and editing is what they need, you may refer to this case’s set-up, however, if both presenter and the information on their slides are important to be recorded with better quality, then using two cameras to record can be considered.